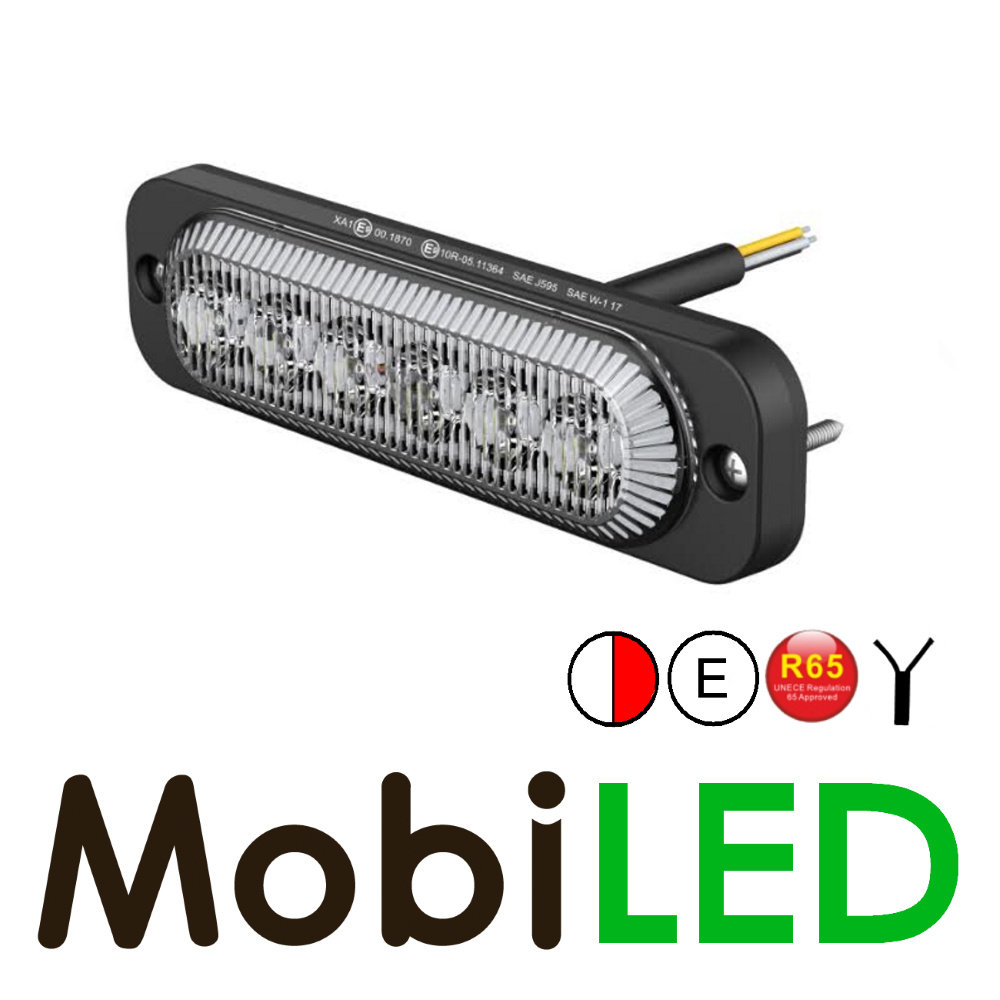
Flasher white/red ultra thin E-mark


This compact flasher is suitable for professional use. Installation in the grill or surface-mounting is possible due to the super thin shape.
No fewer than six powerful 3 watts Osram LEDs with a total power of 18 watts ensure a high light output. The flasher is equipped with a plastic lens that additionally amplifies the light and ensures a good spread, and with a wide aluminum mounting plate.
Can be used on 12 and 24 volts (multivoltage).
Connecting several flashers is possible both synchronous and asynchronous. There is a choice of 10 different flash patterns. This flasher is also available in amber, white, red, blue and white/amber.
Connection diagram:
- Red: connect to +
- Black: connect to –
- Yellow: selection wire, touch the + with the wire to change the flash pattern
Connection diagram (two or more flashers; synchronous):
- Red: connect all red wires bundled to +
- Black: connect all black wires bundled to –
- Yellow: With the bundled yellow wires, touch and hold the + for 3 to 4 seconds. All flashers will turn off for 1 second and then turn on again. Now the flashers are synchronized. Each time you touch the + with the bundled yellow wires, the flash pattern changes for all flashers.
Connection diagram (two or more flashers; asynchronous):
- Red: connect all red wires bundled to +
- Black: connect all black wires bundled to –
- Yellow: with the bundled yellow wires, touch and hold the + for 3 to 4 seconds. All flashers will turn off for 1 second and then turn on again. Now the flashers are synchronized. Each time you touch the + with the bundled yellow wires, the flash pattern changes for all flashers.
- Green: connect one (1) green wire to + to make the flashers flash back and forth.
Product specifications
- Article number
- FL050
- Length (cm)
- 12
- Height (cm)
- 3,2
- Depth (cm)
- 1,45
- Shape
- Long model
- Number of LEDs
- 6
- Housing material
- Aluminum
- Lens material
- PC
- Housing colour
- Black
- Light colour
- White / Red
- Lens colour
- Transparant
- Tension
- 12-24V
- Power
- 18W
- Mounting type
- Flat mounting
- Mounting options
- Screw
- Flush-mounted / surface-mounted
- Surface-mounting or flush-mounting
- Connection
- Cable
- Number of wire cores
- 4
- Certification
- CE E9
- Vehicle side
- Universal (L/R)
- Indicator function
- No
- Position light function
- No
- Number of patterns
- 10
- Synchronisation possible
- Yes
- Packed per
- 1

 Clearance sale
 Compact
 Universal
 Trailer
 Trailer triangle
 Model Hamburger
 Fristom 313-314 Serie
 Z-T040 Series
 Fristom 110-113 Series
 Round
Round Pentagonal
 Mist - reversing light
 Brake lights
 Slim-line
 Strands block lamps
 Strands Dark look
 Fristom 120-220 Series
 Fristom 130-170 Series
 Fristom 230 Series
 Fristom 270 Series
 Fristom 370 Series
 Fristom 371-372 Series
 Fristom 320-400 Series
 Fristom 330-332 Series
 Fristom 500 Series
 Fristom 600 Series
 Fristom 700 Series
 Horpol Carmen
  Horpol Roca
 Horpol Cleo
 Horpol modulair
 LED Autolamps 80-100 Series
 WAS W170 Series
 WAS W184-W185 Series
 WAS W187 Series
 WAS W150DD Series
 Trailer lighting sets
 WAS W225-W228 Series
 WAS W248-W252 Series
 Combi led bar - rear light
 Wiring harness bayonet
 Clearance sale
 Standard
 Pro series
 Top series
 Light bars
 With position light
 With strobe
 AGRI
AGRI Built in / mounted
 Scene lights
 Mini
Mini Forklift
 ADR
ADR Inspection lights
 Handle / switch
 Clearance sale
 Elongated
 Round
Round Other shapes
 Clearance sale
 Amber
Amber Red
Red White
White Blue / green
 Warning / work lights
 Small
Small With position light
 Halo
Halo License plate
 Dash lights
  Frames
 Tail lift
 Clearance sale
 Din mount
 Fixed mount
 Magnet mount
 Blue / green
 Clearance sale
 M-LED
M-LED Ledson EPIX
 Spotlights larage oval
 Spotlights White
 Spotlights large round
  LAZER Sentinel
 Optibeam
 LAZER Racepod
 LAZER Carbon
 Spotlight small
 Flood lights
 Side shooters
 Clearance sale
 Small
Small M-LED Slimline
 M-LED Road Pilot
 Delta
Delta Optibeam dark look
 Large
Large ECCO 13 Series
 ECCO 6 Series
 ECCO 12+ Series
 Narrow
 Traffic advisors
 Control panels
 Clearance sale
 M-LED Sergeant
 M-LED Hero
 M-LED Gladiator
 M-LED HD Black Series
 Optibeam Savage
 Optibeam Super Captain Dual
 Optibeam Pure
 With flash function
 OZZ Black
 OZZ White
 Ledson EPIX+
 Ledson ORBIX+
 LAZER Linear
 LAZER Triple-R
 LAZER Air
 LAZER Glide
 LAZER Carbon
 LAZER Grille kits
 With position light
 Strands Nuuk
 Strands Siberia
 Strands Siberia XP
 Strands Siberia curved
 Strands Siberia XP Curved
 Strands Night Guard
 Strands Miscellaneous
 Combi led bar - Rear light
 C-type basic
 D-type basic
 Ollson 200-400 Series
 Curved
 X-Vision Genesis II
 Dark look
 Double burners
 Classic
 Amber
Amber Amber with reflector
 Amber suspended
 Red
Red Red with reflector
 Red suspended
 White
White White with reflector
 White suspended
 Blue / green
 Budget line
 Round
Round Transparant
 Multi color
 Top lamps
 Talmu
Talmu Styling
 Mounting material
 Clearance sale
 Danish model
 WAS W48-49 Series
 WAS W74 Series
 WAS W148 Series
 WAS W168 Series
 Horpol LDCC Series
 Horpol LD500 Series
 Horpol LD700 Series
 Horpol LD2100-3110 Series
 Horpol Dragon Series
 Fristom 140 Series
 Fristom 145 Series
 Fristom 146 Series
 Aspöck Superpoint Series
 Hanging
 Universal
 Pablo Spanish lamp
 Pendent lamps action set
 Headlight units
 Position lights
 BA9s
BA9s BA15s
BA15s BAU15s
 BAY15d
 SV 8.5
 W2x4.6d (T5-W2W)
 W2, 1x9,5d (T10-W5W)
 W2x4.6d (P27/7W)
 W3x16d (W21W)
 W3x16q (W21/5W)
 H1 (p14,5s)
 H3 (PK22s)
 H4 (P43t)
 H7 (Px26d)
 H8 (PGJ19-1)
 H9 (PGJ19-5)
 H10 (PY20d)
 H11 (PGJ19-2)
 H15 (PGJ23t-1)
 H16 (PGJ19-3)
 H18 (PY26d-1)
 H19 (PU43t-3)
 HIR1 (PX20d)
 HIR2 (PX22d)
 HB3 (P20d, 9005)
 HB4 (P22d, 9006)
 R2 (P45t)
 Complete sets
 Monitors
 Cameras
 Accessories
 Cables
 Heat shrink tubings
 Cable ties
 Cable seals
 Junction boxes
 Sockets
 Electrocoils
 Connectors
 Control panels
 Switches
 Cable sets
 Relays and fuses
 Assortments boxes
 M-LED Cable terminals
 Pliers and press tools
 Brackets
 Resistors canbus
 Battery terminal clamps
 Cable sets bayonet
 M-LED
M-LED Lazer
Lazer Fristom
 OZZ
OZZ Horpol
 Strands
 Optibeam
 WAŚ
WAŚ  Osram
Osram Crawer
 OLEDONE
 LED autolamps
 TruckLED
 Scanstrut
 Ollson
 Hella
Hella Aspöck
 Gylle
Gylle Juluen
 Ledson
 SAE
SAE Avery Dennison
 X-Visison
 Bullboy
 W-Light
 Gadgetme
 Philips
 Ecco
Ecco


